
Disaster Recovery with OADP on ROSA HCP
This content is authored by Red Hat experts, but has not yet been tested on every supported configuration. This guide has been validated on OpenShift 4.22. Operator CRD names, API versions, and console paths may differ on other versions.
This guide shows a disaster recovery pattern for applications running on two existing ROSA HCP clusters. It uses OADP to back up and restore Kubernetes resources, S3 Cross-Region Replication for object data, and EFS replication for persistent file data.
Our validated workflow supports two key disaster recovery (DR) scenarios, giving you the flexibility to balance readiness and cost:
- Hot-to-Warm Recovery: Both the primary and DR clusters run simultaneously. However, to keep things lightweight, the applications aren’t actually deployed on the DR cluster until a failover is triggered.
- Hot-to-Cold Recovery: Designed to maximize cost savings, this approach scales the DR cluster down to zero active worker nodes when not in use.
This article keeps the recovery decisions visible. Helper scripts are used only for repetitive setup tasks such as IAM, OADP installation, and recording EFS PVC mappings.
Prerequisites
Before starting this guide, complete the Create ROSA HCP Disaster Recovery Infrastructure guide. That guide sets up:
- EFS CSI Driver on both clusters
- S3 Cross-Region Replication for application data and backup buckets
- EFS replication from the primary to the DR Region
You need the environment variables from that guide still set in your shell. If you are starting a new shell session, re-run the environment variable steps from the DR infrastructure guide .
The helper scripts are in the
rosa-dr-scripts
repository. If you followed the
DR infrastructure guide
, you already have it cloned. Run the commands from the rosa-dr-scripts directory:
If you follow the DNS failover workflow in this guide, you also need:
- A Route 53 public hosted zone
- A custom domain or hostname where you are allowed to create DNS records
certbot- The
certbot-dns-route53plugin
Verify the Route 53 Certbot plugin before starting the DNS failover section:
Architecture
The OADP DR pattern adds to the shared DR infrastructure:
- OADP installed on both clusters
- An example workload that writes object data to S3 and file data to EFS
During recovery, OADP restores the Kubernetes objects. EFS file data is not restored dynamically by OADP. Instead, the DR cluster reconstructs one EFS access point for each recorded PVC path, then uses static PersistentVolumes with volumeHandle: <dr-efs-id>::<dr-access-point-id>. This preserves the original replicated EFS paths and the access point POSIX identity needed for writes.
1. Configure OADP
Install the OADP operator on both clusters using IRSA, then create the DataProtectionApplication on each.
Install the OADP Operator
Log in to the primary cluster, then install OADP:
Log in to the DR cluster, then install OADP:
The script creates the IAM policy, IAM role with OIDC trust, the cloud-credentials secret, and installs the OADP operator subscription. It does not create the DataProtectionApplication.
Create the DataProtectionApplication
The DataProtectionApplication (DPA) tells OADP where to store backups. Each cluster gets its own DPA pointing to its regional OADP bucket. The cloud-credentials secret created by the install script provides the IAM role that Velero uses to read and write backup data in S3.
Log in to the primary cluster, then create the DPA:
Log in to the DR cluster, then create the DPA:
Verify the BackupStorageLocation on each cluster:
The phase must be Available.
2. Deploy the Example Workload
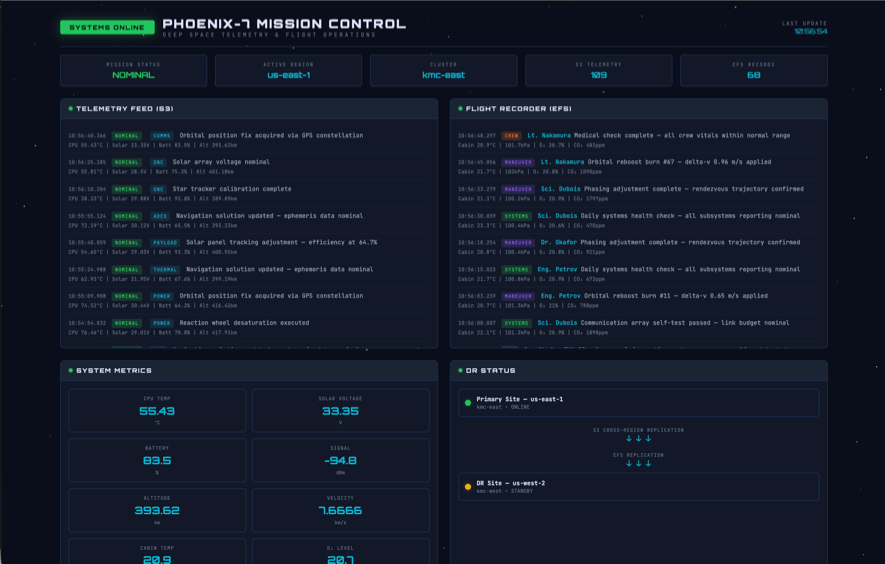
Phoenix Mission Control is a space-themed demo application that exercises the recovery cases this guide cares about:
- S3 object writes
- Shared EFS file data
- StatefulSet replicas with ordinal PVCs
- A web dashboard accessible via an OpenShift route
Deploy the workload on the primary cluster:
Log in to the primary cluster, then deploy:
The script clones the Helm chart, installs the application with your cluster’s S3, EFS, and IRSA values, and waits for all workloads to be ready.
For your own application, use an equivalent workload that has both S3 and EFS data and at least one StatefulSet.
Verify the workload:
Get the application route and confirm it is accessible:
Open the URL in a browser and confirm the Mission Control dashboard loads. Verify that telemetry data is being recorded and the S3 connection is healthy before proceeding.
Create visible test data:
3. Record EFS PVC Mappings Before Failure
OADP backs up Kubernetes resources but does not restore EFS-backed PersistentVolumes dynamically. During recovery, the DR cluster needs to recreate static PVs that point to the correct replicated EFS paths and access point identities. This step captures that metadata from the primary cluster. Run it before a disaster — the primary cluster API may not be available when you need it.
Log in to the primary cluster, then record the mapping:
The mapping file records:
- PVC name
- PV name
- Source EFS access point ID
- EFS root path
- Access point POSIX UID and GID
- Root directory owner UID, owner GID, and permissions
- StatefulSet ordinal, if the PVC name ends in an ordinal
- Requested storage
- Access modes
Example:
This mapping is critical for EFS recovery.
When the EFS CSI driver dynamically provisions a restored PVC, it creates a new access point with a new root path. The replicated data remains under the original primary root path. If the DR restore creates new dynamic access points, the application can mount empty directories even though the data exists on the DR EFS file system.
The DR static PV must also use an access point, not only a direct file-system path mount. A direct path mount such as ${DR_EFS}:${EFS_PATH} can read replicated files, but it bypasses the original access point POSIX identity and can fail on new writes with Permission denied. The mapping therefore records enough source access point metadata to recreate a DR-side access point for each original PVC path.
StatefulSets require extra attention. A StatefulSet volume claim template creates separate PVCs for each ordinal, such as:
flight-data-flight-recorder-0flight-data-flight-recorder-1
Each ordinal PVC can have a different original EFS path. Record every PVC separately and update the mapping whenever PVCs are recreated.
Store the mapping file with your DR runbook. Do not assume the primary cluster API will be available during a disaster.
4. Configure DNS Failover
Set up automatic DNS failover so that when the primary cluster becomes unavailable, traffic is routed to the DR cluster. The steps below use Route 53 health checks and failover routing. If you use a different DNS provider, configure the equivalent failover records and health checks with that provider.
Get the router hostnames
Log in to the primary cluster:
Log in to the DR cluster:
Create a Route 53 health check
Create failover DNS records
Set your hosted zone ID and custom domain:
Create the PRIMARY failover CNAME record:
Create the SECONDARY failover CNAME record:
Create a TLS certificate for the custom domain
Use Let’s Encrypt with the certbot-dns-route53 plugin. Certbot uses your AWS credentials to create a temporary TXT record in Route 53 for domain validation.
Important: Replace your-email@example.com with your actual email address. Certbot will fail if you do not provide a valid email.
Set the certificate paths:
Add the custom domain route
Log in to the primary cluster:
Verify the custom domain resolves to the primary cluster by opening https://$DR_DOMAIN in a browser. The OADP backup in the next step captures this route, and the restore recreates it on the DR cluster during failover.
5. Create an OADP Backup
Log in to the primary cluster, then create the backup:
The backup intentionally excludes PVs and PVCs. EFS data is protected by EFS replication, and the DR cluster recreates the EFS claims from the mapping file recorded before the disaster.
Wait for the backup to complete and verify it replicates to the DR bucket:
The script waits for the backup phase to reach Completed, lists the backup objects in the primary OADP bucket, and waits for the exact backup prefix to appear in the DR OADP bucket through S3 CRR.
For validation-only testing, the script has an optional --sync-to-dr-for-validation flag that copies the exact Velero backup prefix from the primary OADP bucket to the DR OADP bucket. Do not use that flag as the normal recovery path because it bypasses the OADP-bucket CRR behavior this guide is validating.
6. DR Scenario 1: Hot-to-Warm Failover
Both clusters have running worker nodes, but the application is deployed only on the primary cluster. This is the fastest failover scenario.
Failover (Primary to DR)
Simulate a primary site failure by stopping the primary worker instances:
EFS replicas are read-only while replication is active. Promote the DR EFS file system to read-write by deleting the replication configuration:
Log in to the DR cluster, then recreate the EFS volumes from the mapping file:
The helper creates one DR EFS access point, one static PV, and one matching PVC for every EFS-backed claim in the mapping file. It waits until every recreated claim is Bound before returning.
Restore the application namespace. PVs and PVCs are excluded because the EFS-backed storage objects were already recreated from the mapping file:
Wait for the restore to complete:
Wait until the output shows Completed.
The restored workload contains primary-region values. Update the service account IAM annotations and environment variables for the DR cluster:
Run the recovery validator:
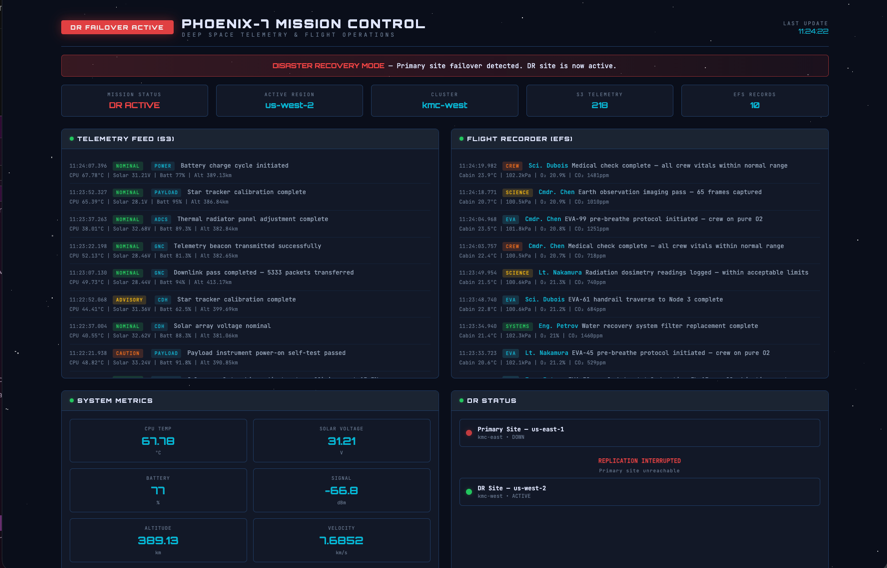
Once the primary workers are down, the Route 53 health check fails and DNS automatically routes traffic to the DR cluster. Open the Mission Control dashboard at your custom domain URL to confirm the failover:
Failback to the Primary Cluster
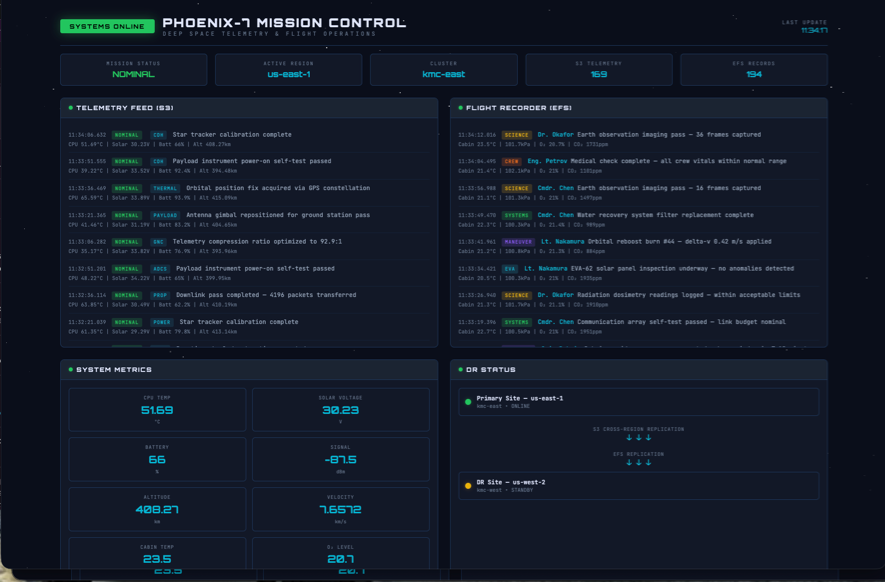
In the hot-to-warm scenario, the primary cluster’s application was never deleted — only the worker nodes were stopped. To fail back, restart the primary workers:
Log in to the primary cluster and wait for all nodes to be ready:
Once the workers are running, the application pods resume automatically. Route 53 returns traffic to the primary cluster when the health check reports it as healthy.
Re-establish EFS replication from primary to DR so it is in place for future failovers:
7. DR Scenario 2: Cold DR (Scaled-Down DR Cluster)
In this scenario the DR cluster’s worker nodes are stopped to save costs. Starting the instances is required before the restore can proceed.
Setup: Scale Down DR Cluster
Delete the dr-demo namespace on the DR cluster to start with a clean state, and remove any static PVs left over from a previous failover (PVs are cluster-scoped and survive namespace deletion):
Log in to the dr cluster
Stop the DR cluster worker nodes to reduce costs during normal operation:
Failover to Cold DR
The backup already exists in S3 from the primary cluster. S3 Cross-Region Replication has copied it to the DR bucket.
Verify the backup is available in the DR bucket:
Force sync the backup to the DR bucket to ensure all objects are present:
Simulate a primary region outage by stopping the primary cluster’s worker instances:
EFS replicas are read-only while replication is active. Promote the DR EFS file system to read-write by deleting the replication configuration:
Start the DR worker instances:
Wait for Velero to be ready:
Log in to the DR cluster, then recreate the EFS volumes from the mapping file:
Restore the application namespace. PVs and PVCs are excluded because the EFS-backed storage objects were already recreated from the mapping file:
Wait for the restore to complete:
Wait until the output shows Completed.
The restored workload contains primary-region values. Update the service account IAM annotations and environment variables for the DR cluster:
Run the recovery validator:
DNS failover happens automatically via the Route 53 health check. Once the pods are running and DNS has updated, you should see the application running on the DR cluster:
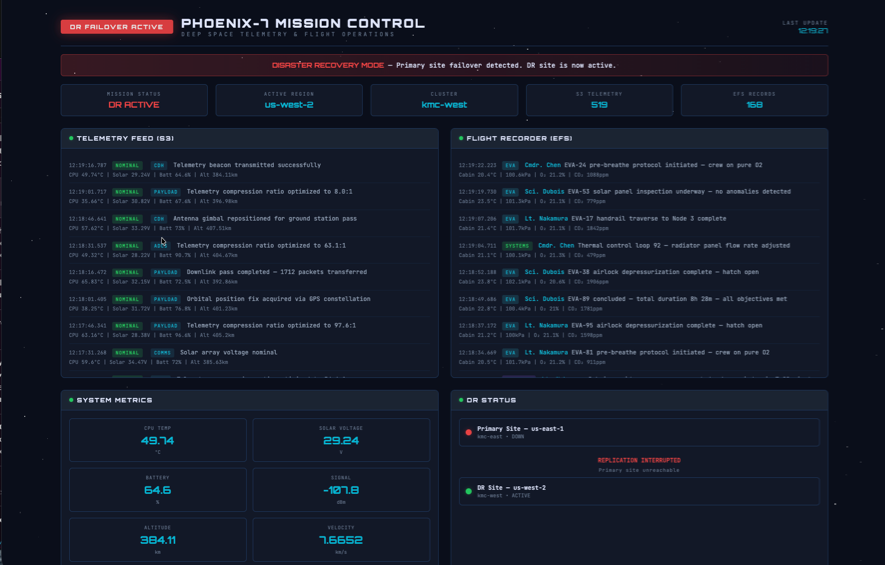
The result is the same as Scenario 1, but the failover takes longer because the DR worker instances had to be started before the restore could proceed.
8. Cleanup
Only run cleanup-openshift.sh if the OADP and EFS CSI installations were created specifically for this exercise. The OpenShift cleanup helper removes the Phoenix namespace, OADP resources, and EFS CSI resources from the current cluster context. If OADP or EFS CSI already existed on the cluster or is shared by other workloads, remove only the exercise-specific resources manually.
Run cleanup in this order and stop if any subsystem fails:
Log in to the primary cluster, then clean up OpenShift resources:
Log in to the DR cluster, then clean up OpenShift resources:
Clean up AWS resources:
The cleanup scripts remove only resources they can identify from the environment variables. The S3 cleanup purges all object versions and delete markers before deleting buckets. The EFS cleanup handles replication already being absent, deletes access points, deletes mount targets, waits until mount targets are gone, then deletes file systems and helper-created EFS security groups. The IAM cleanup detaches policies before deleting helper-created roles and customer-managed policies, including EFS CSI resources.
Delete Route 53 records and health check (if created):
Validate cleanup. Log in to the primary cluster first, then run the validator. Repeat while logged in to the DR cluster:
The validator checks AWS resources (S3, EFS, IAM) and OpenShift resources on the currently logged-in cluster. It prints PASS deleted for absent resources and returns nonzero if any remain.
